Discover the Transformative Benefits of Side Screen Awnings
Enhance Your Outdoor Living Space with Privacy and Comfort
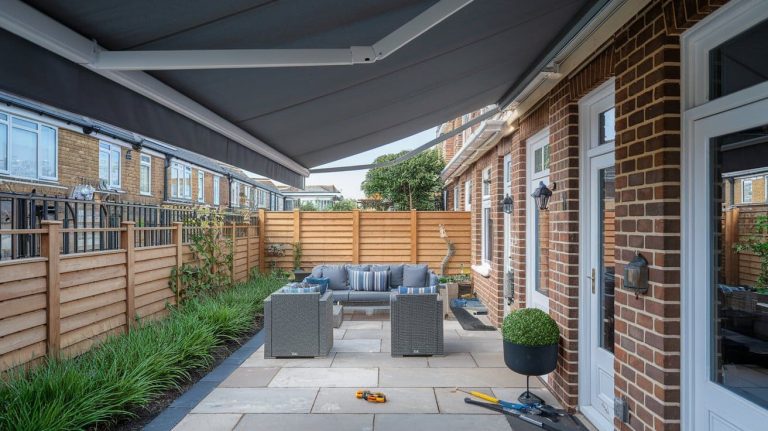
Side screen awnings are an elegant and practical solution for homeowners looking to enhance their outdoor spaces. Whether you’re creating a cosy retreat on your patio, shielding your balcony from prying eyes, or adding a stylish windbreak to your garden, these awnings offer a seamless blend of functionality and aesthetics.
Key Benefits of Side Screen Awnings
- Privacy & Seclusion – Enjoy your outdoor space without unwanted attention from neighbours or passersby. Side screen awnings create a personal sanctuary, perfect for relaxation or entertaining.
- Sun & Wind Protection – Reduce glare, block harsh sunlight, and shield against strong winds, ensuring a more comfortable outdoor experience.
- Aesthetic Appeal – Available in a range of colours, materials, and designs, these awnings can be customised to complement your home’s architecture and personal style.
Why Homeowners Love Side Screen Awnings
Homeowners appreciate the versatility and ease of installation that side screen awnings provide. Unlike permanent structures, they offer a flexible, retractable solution that adapts to changing weather conditions and personal preferences. Their durable, weather-resistant fabrics ensure longevity, making them a cost-effective investment for any outdoor space.
Expert Installation with The Outdoor Living Group
At The Outdoor Living Group, we specialise in the professional installation of high-quality Weinor side screen awnings. Our expert team ensures a seamless fit tailored to your space, offering bespoke solutions that align with your needs. Book a consultation today and discover how our premium awnings can transform your outdoor living experience.
What Tools and Materials Are Required for Installation?
Essential Tools for a Smooth Installation
Installing side screen awnings requires precision, and having the right tools ensures a seamless process. Essential tools include:
- Measuring Tape & Level – Accurate measurements and alignment are crucial for a perfect fit.
- Drill & Screwdriver Set – Necessary for securing brackets and mounting components.
- Adjustable Wrench & Socket Set – Helps tighten bolts and ensure structural stability.
- Stud Finder – Identifies secure mounting points on walls or posts.
- Pencil & Marking Tools – For precise placement before drilling.
- Ladder – Ensures safe access to higher installation points.
Required Materials for a Secure Installation
Beyond tools, selecting high-quality materials enhances durability and performance. Key materials include:
- Mounting Brackets & Screws – Ensure a firm and stable attachment.
- Side Screen Awning Cassette & Fabric – The core components, available in various designs and materials.
- Anchors & Wall Plugs – Provide additional support when mounting on masonry or drywall.
- Weatherproof Sealant – Protects against moisture infiltration at connection points.
Preparation Checklist
Before starting, ensure all tools and materials are ready. Lay out components, double-check measurements, and review the installation guide to avoid delays.
Recommended Brands & Quality Considerations
Opt for stainless steel hardware to prevent rust and choose weather-resistant fabrics for longevity. Investing in high-quality tools also improves efficiency and ensures a professional finish.
With the right tools and materials, the installation process becomes straightforward, leading to a secure and visually appealing result.
How to Prepare and Plan for Installation?
Accurate Measurement Techniques
Precision is the cornerstone of a successful side screen awning installation. Begin by measuring the width and height of the intended installation area using a high-quality measuring tape. Ensure measurements are taken at multiple points to account for any variations in surface level. A spirit level helps confirm alignment, preventing installation issues later. For installations on uneven surfaces, consider using a laser level for enhanced accuracy.
Planning Steps and Timelines
A well-structured plan streamlines the installation process. Start by identifying the mounting surface—whether it’s a wall, post, or pergola frame—and ensure it can support the awning’s weight. Check for obstructions such as gutters, pipes, or electrical wiring that may interfere with installation. Once the site is confirmed, create a timeline that includes:
- Measurement and Site Assessment – 1-2 hours
- Gathering Tools and Materials – 1 hour
- Marking Drill Points and Prepping the Surface – 1 hour
- Installation and Adjustments – 2-3 hours
Component Readiness Checklist
Before installation, verify that all components are accounted for. A standard checklist includes:
✔ Awning Cassette and Fabric – Ensure no damage or defects.
✔ Mounting Brackets and Screws – Confirm compatibility with the installation surface.
✔ Drill and Anchors – Select the appropriate type for the material (brick, wood, or concrete).
✔ Weatherproof Sealant – Protects against moisture ingress at connection points.
Common Preparation Mistakes to Avoid
- Inaccurate Measurements – Double-check dimensions to prevent misalignment.
- Ignoring Surface Stability – Weak or uneven surfaces may require reinforcement.
- Skipping a Test Fit – Temporarily positioning components before drilling ensures a precise fit.
By meticulously planning and preparing, the installation process becomes smoother, reducing the likelihood of errors and ensuring a secure, long-lasting result.
How to Instal Side Screen Awnings Step-by-Step
Step 1: Prepare the Installation Area
Before beginning, ensure the installation area is clean, stable, and free from obstructions. Gather all necessary tools, including a measuring tape, drill, level, and screwdriver set. Mark the mounting points using a pencil to ensure precise alignment.
Step 2: Secure the Mounting Brackets
- Use a drill to create pilot holes at the marked positions.
- If mounting on masonry, insert wall plugs for added stability.
- Attach the mounting brackets with screws, ensuring they are level and firmly secured.
Step 3: Instal the Awning Cassette
- Position the awning cassette onto the mounted brackets.
- Secure it using the provided fasteners, ensuring even placement.
- Double-check alignment before fully tightening the screws.
Step 4: Extend and Adjust the Awning
- Gently pull the side screen awning from the cassette.
- Guide it to the opposite mounting point and lock it into place using the end post or latch mechanism.
- Adjust the tension to ensure smooth operation.
Step 5: Final Checks and Adjustments
- Test the awning by retracting and extending it multiple times.
- Ensure the fabric remains taut and the mechanism operates smoothly.
- Tighten any loose fittings and apply weatherproof sealant where necessary.
Advanced Techniques for Challenging Installations
For uneven surfaces, use adjustable mounting brackets to compensate for height differences. If installing on a pergola or freestanding structure, additional support posts may be required for stability.
By following these steps, you can achieve a secure and functional installation, enhancing your outdoor space with privacy and protection.
What Safety Precautions Should Be Taken?
Recommended Safety Gear
Ensuring safety during the installation of side screen awnings starts with using the right protective equipment. Essential safety gear includes:
- Safety Goggles – Protects eyes from dust, debris, and accidental splinters while drilling.
- Heavy-Duty Gloves – Provides grip and shields hands from sharp edges and rough surfaces.
- Non-Slip Ladder – Ensures stability when working at height, reducing fall risks.
- Ear Protection – Recommended when using power tools to prevent hearing damage.
- Dust Mask – Helps prevent inhalation of fine particles, especially when drilling into masonry.
Preventing Accidents During Installation
A well-organised workspace minimises risks and ensures a smooth installation process. To prevent accidents:
- Keep the installation area clear of obstacles and tripping hazards.
- Secure extension cords to avoid entanglements and falls.
- Always have a spotter when working at height to stabilise the ladder.
- Use proper lifting techniques when handling heavy components to prevent strain injuries.
Common Safety Hazards to Be Aware Of
Several hazards can arise during installation. Being aware of them helps prevent injuries and ensures a secure setup:
- Unstable mounting surfaces – Always check the integrity of walls or posts before securing brackets.
- Over-tightening screws – This can weaken materials and compromise structural stability.
- Misaligned brackets – Improper alignment can cause the awning to function incorrectly or become unstable.
- Electrical wiring risks – Use a stud finder with a wire detection feature to avoid drilling into hidden electrical lines.
Meeting Safety Standards
To ensure a safe and compliant installation:
- Follow manufacturer guidelines for proper mounting and weight distribution.
- Use appropriate fixings for the surface type (brick, wood, or concrete).
- If installing on a high wall or balcony, consider using harnesses or safety rails for added protection.
- Regularly inspect tools for wear and tear, replacing any damaged components before starting.
By prioritising safety at every stage, homeowners can confidently instal side screen awnings while minimising risks and ensuring a secure, long-lasting result.
How to Troubleshoot Common Installation Issues?
Identifying and Resolving Common Problems
Installing side screen awnings can sometimes present challenges, but most issues can be resolved with the right approach. Understanding common problems and their solutions ensures a smooth installation process and optimal performance.
Troubleshooting Alignment Problems
One of the most frequent issues is misalignment, which can cause difficulty in extending or retracting the awning. To correct this:
- Check mounting bracket positions – Ensure they are level and evenly spaced. A spirit level helps confirm alignment.
- Adjust tension settings – If the fabric appears loose or uneven, fine-tune the tensioning mechanism according to the manufacturer’s instructions.
- Inspect for obstructions – Ensure no external elements, such as gutters or uneven surfaces, are interfering with the awning’s movement.
Solutions for Loose Fittings
Loose fittings can compromise stability and functionality. To address this:
- Tighten all screws and bolts – Use an adjustable wrench to secure connections, but avoid over-tightening, which may damage components.
- Use appropriate wall anchors – If mounting on masonry or drywall, ensure the correct type of anchors is used for a firm hold.
- Apply thread-locking adhesive – This prevents screws from loosening over time due to wind or frequent use.
Addressing Retraction and Extension Issues
If the awning does not retract smoothly:
- Lubricate moving parts – Use a silicone-based lubricant to reduce friction.
- Check for fabric obstructions – Ensure the fabric is not caught or twisted within the cassette.
- Inspect the spring mechanism – If the tension is too tight or too loose, adjust it accordingly.
When to Seek Professional Assistance
For complex issues such as structural instability, motorised awning malfunctions, or persistent misalignment, consulting a professional ensures a safe and effective resolution. Proper troubleshooting enhances the longevity and functionality of side screen awnings, providing lasting comfort and protection.
How to Maintain and Care for Side Screen Awnings
Regular Maintenance for Longevity
Routine upkeep ensures that side screen awnings remain functional and visually appealing for years. A simple monthly inspection helps identify any early signs of wear, such as loose fittings or fabric tension issues. Check the mounting brackets for stability and ensure the retracting mechanism operates smoothly.
Cleaning and Care Techniques
Keeping the awning fabric clean prevents dirt buildup and extends its lifespan. Use a soft brush to remove dust and debris, followed by a mild soap solution and lukewarm water for deeper cleaning. Avoid harsh chemicals or pressure washers, as they can damage the fabric’s protective coating. Rinse thoroughly and allow the awning to dry completely before retracting to prevent mould or mildew formation.
For the frame and mechanical components, a damp cloth with a mild detergent is sufficient. Lubricate moving parts with a silicone-based spray to maintain smooth operation and prevent rust.
Tips to Extend the Lifespan
- Retract during extreme weather – Strong winds and heavy rain can put unnecessary strain on the structure.
- Store properly in winter – If not in use for extended periods, ensure the awning is dry before retracting to prevent moisture damage.
- Inspect for signs of wear – Address minor issues promptly to avoid costly repairs.
Recommended Maintenance Products
Opt for UV-protective fabric sprays to enhance resistance against sun exposure and anti-mildew treatments for humid climates. Using stainless steel cleaning wipes helps maintain the frame’s finish, ensuring a polished look year-round.
By following these maintenance practices, side screen awnings will continue to provide shade, privacy, and style for many seasons.
Contact The Outdoor Living Group Today
Expert Installation for a Seamless Outdoor Experience
Transforming your outdoor space with side screen awnings is an investment in comfort, privacy, and style. While DIY installation is an option, professional expertise ensures a flawless finish, optimal functionality, and long-term durability. At The Outdoor Living Group, we specialise in the installation of Weinor side screen awnings, delivering precision-engineered solutions tailored to your property.
Our Services for Side Screen Awnings
We offer a comprehensive installation service, ensuring your awning is securely mounted and perfectly aligned. Our team conducts on-site assessments, providing expert recommendations based on your space, structural compatibility, and aesthetic preferences. Whether you need a wall-mounted, freestanding, or pergola-integrated solution, we customise the installation to suit your needs.
Beyond installation, we provide post-installation support, including maintenance guidance and troubleshooting assistance. Our commitment to quality ensures that your awning remains in peak condition for years to come.
Why Choose Professional Installation?
Opting for professional installation guarantees:
- Precision Fit – Avoid misalignment and ensure smooth operation.
- Structural Integrity – Secure mounting for enhanced durability.
- Time Efficiency – Save time and effort with expert handling.
- Warranty Protection – Maintain manufacturer warranties with certified installation.
Get in Touch Today
Ready to enhance your outdoor space? Contact The Outdoor Living Group today for a consultation. Our team is here to guide you through the selection and installation process, ensuring a seamless experience from start to finish.
Call us: [Insert Contact Number]
Email us: [Insert Email Address]
Visit our website: [Insert Website URL]
Discover the difference of expert craftsmanship and premium-quality Weinor awnings with The Outdoor Living Group.
FAQ’s
What Are the Steps for Installing a Side Screen Awning?
Step 1: Measure and Mark the Installation Area
Accurate measurements are essential for a seamless installation. Use a measuring tape to determine the width and height of the installation space. Mark the mounting points with a pencil to ensure precise alignment. A spirit level helps maintain straight lines, preventing misalignment issues later.
Step 2: Secure the Mounting Brackets
Drill pilot holes at the marked positions, ensuring they align with structural supports. If mounting on masonry, insert wall plugs for added stability. Secure the mounting brackets with screws, double-checking that they are level and firmly attached.
Step 3: Instal the Awning Cassette
Position the awning cassette onto the mounted brackets and fasten it securely. Ensure the cassette is evenly placed to allow smooth operation. Tighten all screws and bolts, but avoid over-tightening, which may damage components.
Step 4: Extend and Lock the Awning
Gently pull the side screen awning from the cassette and guide it to the opposite mounting point. Lock it into place using the end post or latch mechanism. Adjust the tension to ensure smooth extension and retraction.
Step 5: Final Adjustments and Testing
Test the awning by retracting and extending it multiple times. Ensure the fabric remains taut and the mechanism operates smoothly. Tighten any loose fittings and apply weatherproof sealant where necessary.
Common Challenges and Solutions
- Misalignment – Use a spirit level to check bracket positioning before securing.
- Loose fittings – Tighten screws and consider using thread-locking adhesive for added security.
- Difficult retraction – Lubricate moving parts with a silicone-based spray to reduce friction.
By following these steps, homeowners can achieve a secure and functional installation, enhancing their outdoor space with privacy and protection.
Which Tools Are Essential for Setup?
Ensuring a Smooth Installation with the Right Equipment
A successful side screen awning installation begins with having the correct tools on hand. Proper equipment not only simplifies the process but also ensures precision and durability.
Key Tools for Installation
- Precision Measurement Tools – A high-quality measuring tape and spirit level are indispensable for ensuring accurate dimensions and perfect alignment.
- Drilling and Fastening Equipment – A power drill with a set of masonry and wood drill bits, along with a screwdriver set, is essential for securing brackets and mounting components.
- Structural Support Tools – An adjustable wrench and socket set help tighten bolts and ensure a secure, stable installation.
- Surface Detection Devices – A stud finder is crucial for locating secure mounting points, preventing unnecessary drilling into weak surfaces.
- Marking and Alignment Aids – Using a pencil or chalk marker allows for precise placement before drilling, reducing errors.
- Ladders and Safety Gear – A sturdy ladder provides safe access to elevated areas, while protective gloves and safety goggles enhance safety during installation.
Recommended Brands for Quality and Reliability
Investing in durable, high-performance tools enhances efficiency and ensures a professional finish. Brands such as Bosch, Makita, and DeWalt offer reliable drills and fastening tools, while Stanley and Milwaukee provide excellent measuring and hand tools. For stud finders, Zircon is a trusted choice.
Tool Maintenance for Long-Term Use
To extend the lifespan of tools:
– Store them in a dry, organised space to prevent rust and damage.
– Regularly clean drill bits and screwdriver tips to maintain efficiency.
– Apply lubrication to moving parts for smooth operation.
Can Tools Be Rented Instead of Purchased?
For those who don’t own all the necessary tools, renting from hardware stores like Home Depot or Toolstation is a cost-effective alternative. This allows access to professional-grade equipment without the need for a full investment.
By equipping yourself with the right tools and maintaining them properly, the installation process becomes more efficient, ensuring a secure and visually appealing result.
What Are the Best Practices for Measuring Side Screen Awnings?
The Importance of Accurate Measurements
Precision is the foundation of a successful side screen awning installation. Proper measurements ensure a seamless fit, preventing misalignment issues that could affect functionality and aesthetics. Taking the time to measure correctly minimises installation errors and enhances the overall stability of the awning.
Step-by-Step Measurement Guide
- Determine the Mounting Points – Identify where the awning will be installed, whether on a wall, pergola, or freestanding post. Ensure the surface is sturdy enough to support the structure.
- Measure the Width – Using a high-quality measuring tape, measure the width of the installation area from one mounting point to the other. Take multiple measurements at different heights to account for any variations.
- Measure the Height – Determine the desired height for the awning, ensuring it provides adequate coverage while maintaining accessibility.
- Check for Obstructions – Look for potential obstacles such as gutters, downspouts, or uneven surfaces that may interfere with installation.
- Confirm Level Alignment – Use a spirit level to ensure the mounting points are even, preventing an uneven or slanted installation.
Tools for Precise Measurement
- Measuring Tape – Ensures accurate width and height readings.
- Spirit Level – Confirms horizontal and vertical alignment.
- Laser Distance Metre – Provides precise digital measurements for larger installations.
- Pencil or Chalk Marker – Marks drilling points for reference.
Common Measurement Mistakes to Avoid
- Ignoring Surface Irregularities – Uneven surfaces can lead to misalignment. Always measure at multiple points.
- Failing to Account for Mounting Brackets – Include bracket dimensions in your measurements to ensure a proper fit.
- Overlooking Clearance Space – Ensure there is enough space for the awning to extend and retract without obstruction.
Professional Measurement Services
For complex installations or large-scale projects, professional measurement services can provide expert precision, ensuring a flawless installation. Proper measurement techniques lay the groundwork for a secure and visually appealing side screen awning.
Why Choose Side Screen Awnings for Your Home?
Privacy and Shade for a More Comfortable Outdoor Space
Side screen awnings provide an effective solution for enhancing privacy and controlling sunlight in outdoor areas. Whether you’re shielding a patio from prying eyes or blocking intense afternoon glare, these awnings create a secluded and shaded retreat. Their ability to philtre UV rays helps maintain a cooler environment, making outdoor spaces more enjoyable even on the hottest days.
Enhancing Outdoor Living Spaces
A well-placed side screen awning transforms patios, balconies, and gardens into functional extensions of the home. By acting as a windbreak, they create a more sheltered environment, allowing for uninterrupted outdoor dining, relaxation, or entertaining. Their adaptability means they can be seamlessly integrated with existing structures, complementing both modern and traditional aesthetics.
Cost-Effective and Durable
Compared to permanent structures, side screen awnings offer a budget-friendly alternative without sacrificing durability. Crafted from high-quality, weather-resistant materials, they are designed to withstand the elements while requiring minimal maintenance. Their retractable nature extends their lifespan, as they can be stored away when not in use, reducing wear and tear.
Aesthetic Appeal and Customization Options
Available in a variety of colours, fabrics, and frame finishes, side screen awnings can be tailored to match any home’s exterior design. Whether opting for a sleek, minimalist look or a bold statement piece, these awnings provide a stylish yet practical addition to any outdoor space.
By combining privacy, protection, and aesthetic appeal, side screen awnings offer a versatile and valuable enhancement to any home.
Common Problems and Solutions for Side Screen Awnings
Troubleshooting Alignment Issues
A misaligned awning can lead to operational difficulties, such as uneven extension or retraction. To correct this:
Verify bracket positioning – Ensure the mounting brackets are level and evenly spaced. A spirit level helps maintain accuracy.
Fine-tune fabric tension – If the fabric appears slack or overly tight, adjust the tensioning mechanism to achieve a smooth, uniform extension.
Inspect for obstructions – Check for any structural elements, such as gutters or uneven surfaces, that may interfere with the awning’s movement.
Resolving Loose Fittings
Loose components can compromise stability and longevity. To address this:
Secure all fasteners – Use an adjustable wrench to tighten bolts and screws, ensuring a firm hold without over-tightening.
Reinforce with appropriate anchors – If mounting on masonry or drywall, select the correct wall anchors to enhance stability.
Apply thread-locking adhesive – This prevents screws from loosening over time due to wind or frequent use.
Fixing Retraction and Extension Problems
If the awning does not retract or extend smoothly:
Lubricate moving components – A silicone-based lubricant reduces friction and ensures seamless operation.
Check for fabric entanglement – Ensure the material is not caught or twisted inside the cassette.
Adjust the spring mechanism – If the awning retracts too quickly or struggles to close, fine-tune the spring tension accordingly.
When to Seek Professional Assistance
For persistent issues such as structural instability, motorised malfunctions, or complex alignment problems, professional intervention ensures a safe and effective resolution. Addressing installation challenges promptly enhances the durability and performance of side screen awnings, ensuring long-term functionality and comfort.
Best Practices for Maintaining Side Screen Awnings
Regular Maintenance for Long-Lasting Performance
To keep your side screen awnings in optimal condition, establish a routine maintenance schedule. Conduct a monthly inspection to check for any loose fittings, fabric tension inconsistencies, or signs of wear. Ensure that the retracting mechanism operates smoothly and that the mounting brackets remain secure. Addressing minor issues early prevents costly repairs and extends the awning’s lifespan.
Effective Cleaning and Care Techniques
Dirt and debris accumulation can compromise both the appearance and functionality of your awning. To maintain its pristine condition:
Dust Removal: Use a soft-bristled brush to sweep away dust and loose particles.
Deep Cleaning: Prepare a mild soap solution with lukewarm water and gently scrub the fabric. Avoid harsh detergents or pressure washers, as they can degrade the protective coating.
Rinsing & Drying: Rinse thoroughly with clean water and allow the awning to dry completely before retracting to prevent mould and mildew formation.
Frame Maintenance: Wipe down the frame with a damp cloth and mild detergent to remove dirt and prevent corrosion.
Maximising Longevity with Preventative Measures
- Protect Against Harsh Weather: Retract the awning during strong winds or heavy rain to prevent unnecessary strain on the structure.
- Seasonal Storage Considerations: If the awning will not be used for an extended period, ensure it is completely dry before retracting to prevent moisture-related damage.
- Routine Hardware Checks: Periodically tighten screws and lubricate moving parts with a silicone-based spray to maintain smooth operation.
Recommended Maintenance Products
For enhanced durability, consider using:
UV-protective fabric sprays to shield against sun damage.
Anti-mildew treatments to prevent mould buildup in humid conditions.
Stainless steel cleaning wipes to maintain the frame’s finish and prevent oxidation.
By following these maintenance practices, your side screen awnings will continue to provide reliable shade, privacy, and style for years to come.